WOO! A friend of mine just shared this with me...I had never been able to get a good working pattern to be able to make this doily...but I think this one might work! I thought I'd share it here in case anyone else is interested. I'm hoping to give this a try! Not right NOW because I'm working on a surprise for a friend for her birthday in April...but once I finish that, and some baby booties for two friends who are expecting, I may be able to give it a go!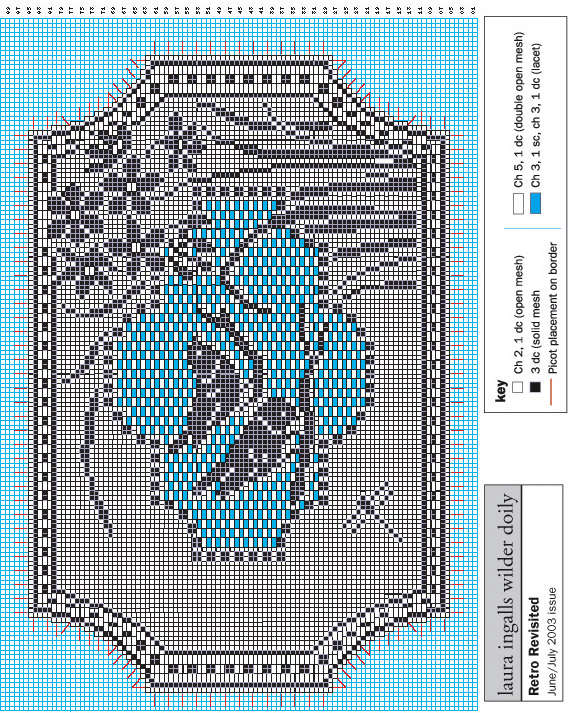
BEG OPEN MESH = ch 5 (first 3 ch counts as dc) skip next 2 sts, dc in next st
INC MESH AT BEG OF ROW = ch 3 for each mesh to be added, plus 5 extra ch at the
end, dc in 9th st or ch from hook (first open mesh of row made)
INC MESH AT END OF ROW = ch 2, trtr in small st as last dc (first inc mesh made),
then work *ch 2, trtr in 2 side strands at center of last trtr made, repeat from * for each
additional mesh to be added.
DEC AT BEG OF ROW = sl st in each st or ch across to position indicated on pattern
DEC AT END OF ROW = leave remainder of row unworked, turn.
STITCH THE DOILY
PATTERN: Beg at bottom edge of chart, ch 318, dc in 9th ch from hook (bottom right
open mesh of pattern completed). Work 103 more open meshes across; turn - row 1
completed.
Continue following chart for remainder of rows. Work even numbered rows from left to
right. Work odd numbered rows from right to left.
BORDER: Work dc in each st, 2 dc in each ch 2 sp, 6 dc in each of the eight corner sp, 2
dc in end of each row, 4 dc in each inc sp and dec sp at beg and end of rows, at the
same time, work picots as indicated on pattern. Fasten off.